Creating Rules
Use this guide when you want to add or tune production rules safely.
Goal
You will:
- choose the right rule lane
- write a rule that returns a configured outcome with
!OUTCOME - test it with realistic payloads
- validate it before rollout
Before You Start
- You can access Rules and Outcomes
- The outcome names you plan to return already exist (for example
HOLD,RELEASE,CANCEL) - You have sample payloads that represent normal and suspicious behavior
- If you plan to use the allowlist lane, you know the currently configured neutral outcome (default
RELEASE)
Step 1: Choose the Right Rule Lane
Every rule now belongs to one of two lanes:
- Main rules: normal decisioning rules that participate in standard outcome resolution
- Allowlist rules: rules that short-circuit the main rule set and immediately return the configured neutral outcome when they match
For most fraud/compliance logic, leave the lane as Main rules.
Choose Allowlist rules only when the rule expresses an explicit trust decision and should stop the rest of the evaluation flow.
See Allowlist Rules for the full rationale and constraints. If you plan to run the main lane in strict sequence, see Ordered Rule Execution in ezrules for when first-match mode is useful and how the platform applies it.
Step 2: Start With a Minimal Rule
Rules are Python-like snippets.
If a condition is met, return a configured outcome with !OUTCOME.
Notes:
- Use
$field_nameto read event fields (for example$amount,$country) - Use dotted paths for nested JSON values (for example
$customer.profile.age,$device.location.country) - Use
stat[entity.feature_name]to read active computed historical features from Features - If no condition matches, return nothing
- If the rule is in the allowlist lane, it must return the configured neutral outcome using
!OUTCOME
Checkpoint:
- The rule saves without syntax errors
- The returned outcome exists in Outcomes
Step 3: Test in the UI First
- Open the rule in Rules
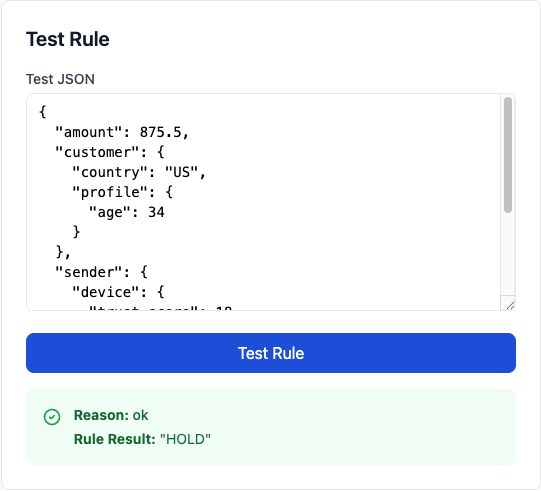
- Use the Test Rule panel
- Paste realistic JSON payloads
- Run at least:
- one payload that should trigger
- one payload that should not trigger
Use Event Tester when you want to dry-run a full event against the currently active rule set instead of testing one rule's source in isolation. Event Tester requires submit_test_events and does not store the submitted event in Tested Events, analytics, or evaluation ledgers.
Type casting in Test Rule
The Test Rule panel applies the same field type casting as live evaluation. If you have configured field types (under Settings → Field Types), values will be cast before the rule runs. Test JSON also contributes to field observations, helping you discover which types your fields carry. See Field Type Management for details.
Warnings for unseen fields
The rule editor warns when your logic references fields that have never been observed in live traffic or rule-test payloads. This does not block saving, but it is a sign that backtests may skip older records that do not contain the new field.
Example payload:
{
  "transaction_id": "txn_101",
  "effective_at": "2026-04-23T12:00:00Z",
  "event_data": {
    "amount": 15000,
    "user_id": "user_42",
    "customer": {
      "profile": {
        "age": 34
      }
    }
  }
}
Checkpoint:
- Triggering cases produce expected outcome
- Non-triggering cases produce no outcome
Step 4: Pick the Right Pattern
Threshold pattern
Use when one field is enough to make a decision.
List-based pattern
Use when decisioning depends on maintained allow/block lists.
Feature-based velocity pattern
Use when a decision depends on recent behavior rather than only the current payload.
Computed features are defined in Features and are resolved as of the event timestamp. V1 features use bounded preset windows such as 10m, 1h, 24h, 7d, 30d, and 90d; arbitrary lifetime windows are intentionally not allowed for online rule evaluation.
Allowlist pattern
Use when a match should immediately produce the configured neutral outcome and skip the normal rule set.
This pattern only makes sense in the Allowlist rules lane.
Multi-signal score pattern
Use when no single field is reliable enough.
risk_score = 0
if $amount > 5000:
    risk_score += 2
if $country in @high_risk_countries:
    risk_score += 2
if $account_age_days < 30:
    risk_score += 1

if risk_score >= 4:
    return !HOLD
Time-window pattern
Use when behavior is suspicious only in specific periods.
Step 5: Avoid Common Mistakes
- Returning an outcome that is not configured in Outcomes
- Using field names that do not exist in event payloads
- Packing too many unrelated conditions into one rule
- Running expensive lookups per event inside rule logic
- Putting broad trust logic into the allowlist lane when it should still be monitored by the main rule set
- Treating allowlist as a convenience
RELEASErule instead of a true short-circuiting policy
Use lists (@list_name) and precomputed signals where possible.
Step 6: Pre-Deployment Validation
Before enabling major rule changes:
- Run UI tests with realistic payloads
- Compare triggered vs non-triggered examples
- Backtest against historical traffic if available, and review label-aware precision/recall if your historical events have been labeled
- Review potential false-positive impact with analysts
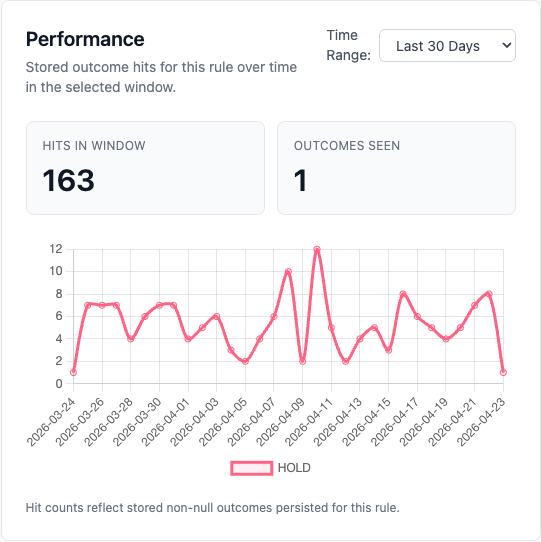
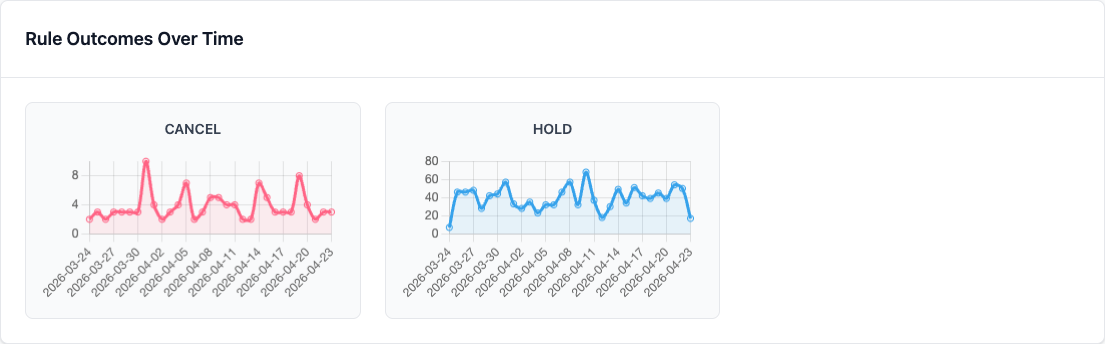
- Confirm observability:
- outcome trends visible in Dashboard
- label feedback visible in Analytics
For higher-stakes changes, add a shadow validation step before promoting to production:
- Deploy the candidate logic to shadow — either the saved rule version or a draft via the edit panel
- Allow shadow results to accumulate over a representative traffic window (typically one full business day)
- Review the shadow vs production outcome comparison in Shadow Rules or via
GET /api/v2/shadow/stats - Promote if the outcome distribution matches your intent, or remove and revise if not
Shadow deployment gives you live-traffic validation without any production impact. See Shadow Deployment for the full workflow.
If you want to move beyond observe-only validation, use Rule Rollouts to serve the candidate logic to a controlled percentage of live traffic while the current production version remains the control.
Allowlist rules are different: they are already production behavior. They cannot be sent through shadow or rollout candidate flows.
By default, editing an active rule saves a new draft version and removes that rule from live production until you promote it again. If your organisation enables Settings → General → Auto-promote edits to active rules, users who also have PROMOTE_RULES can save an edit to an active rule and keep it live immediately.
If you need to stop an active rule temporarily without retiring it, use Pause Rule. A paused rule is excluded from live production evaluation but stays available for editing and later Resume Rule when you want to reactivate it. Pausing requires the dedicated pause_rules permission; resuming still requires promote_rules.
Review History and Roll Back Safely
If a new rule version performs worse than expected, you do not need to rewrite the old logic by hand.
- Open the rule and click Visualize history.
- Review the diff timeline to find the last known good revision.
- Click Roll back to revision ... on that historical version.
- Confirm the dialog after checking the current-to-target diff.
Rollback does not delete anything. It creates a brand new draft version using the selected historical revision's logic and description, while preserving the full audit trail. If the rule was previously active, promote the new draft after verification to put it back into production.
Use rollback when:
- a recent edit introduced false positives or missed detections
- you need to restore known-good logic quickly during incident response
- you want to recover an older description/logic pair without losing later audit entries
Debugging
If a rule is not behaving as expected:
- Re-test using the exact payload that failed
- Verify outcome exists in Outcomes
- Confirm list names/entries referenced in the rule exist
- Inspect evaluator API response fields:
rule_resultsoutcome_countersoutcome_set
You can also generate fraud-oriented demo data with familiar transaction fields:
For broader incident diagnostics, use Troubleshooting.
Next Steps
- Field Type Management - ensure fields are compared with the right types
- Allowlist Rules - when trusted traffic should short-circuit the normal rule set
- Labels and Lists - tune decision quality with labels and reusable lists
- Analyst Guide - end-to-end analyst workflow
- Monitoring & Analytics - validate production behavior